December 30, 2009

Happy New Year!

Wishing you a warm and festive evening and a peaceful, joyful year to come. 

IMG_2634

Thanks for hanging in with me despite the silence from my end.  I'll be back in the new year, lots of things to post...  You'll never guess where we are now (hint: I'm eating my weight in cheese and glacee.)

November 28, 2009

We're in trouble...

because Finn can roll, oh boy can he roll!

November 19, 2009

Hola from Baja!

Just a quick note:  we've arrived safely in La Ventana and are enjoying walking in the sand and putting our toes in the water.

IMG_1864

IMG_1769

I've got a few posts in the works.  Remember that acorn hat?  The pattern is coming up... 

November 16, 2009

Maple Pecan Cookies

So I had this idea to make cookies with maple syrup. After a few disappointing recipes, I hit on this gem.  The cookies are delicious plain, but topping them with maple icing and pecans turns them into something worth sharing.

IMG_1642

Buttery and rich but still delicate and crisp, these cookies are perfectly special. I passed a dozen on to some friends who needed cheering up and I packed a box full for Arnoud and his friends who are on their way down to Baja. They're driving down with Arnoud's motorcycle and our kitesurfing gear; I'm a little nervous about sending my sweetie off on that long drive without me, so these cookies are my little bit of protection and a sweet little kiss to carry him safely to his destination.

IMG_1299

Tomorrow Finn, Humphrey and I fly down to join the boys for a month-long vacation. It's Finn's first plane flight and first international trip (and Mama's first time traveling with a dog and a child -- thank heavens my Mama is coming with!) I'll be taking lots of Christmas knitting and my camera -- expect photo updates. Until then!

IMG_1320

Maple Pecan Cookies
adapted from Gourmet
Makes at least 5 dozen


for cookies:
  • 2 sticks (1 cup) unsalted butter, softened
  • 1 cup sugar
  • 1/2 cup Grade B maple syrup
  • 1 large egg yolk
  • 1 teaspoon salt
  • 3 cups all-purpose flour
for icing:
  • 2 cups powdered sugar
  • 1 Tablespoon butter, softened
  • 4 Tablespoons Grade B maple syrup
  • 1/2 teaspoon vanilla
  • 1 to 1 1/2 Tablespoons milk
whole pecans to garnish

1. In a standing mixer cream together butter and sugar until light and fluffy. Beat in maple syrup and egg yolk until mixture is combined well.
2. Sift together salt and flour over mixture and stir into maple mixture.
3. Roll dough into 12" log. Chill dough, wrapped in plastic wrap, until firm, about 2 hours. Dough may be made 4 days ahead and chilled.
3. Preheat oven to 350°F. Cut dough into 1/8 inch thick slices. Arrange cookies on buttered or parchment lined baking sheets.
4. Bake cookies in batches in middle of oven until edges are golden, about 12 minutes, and transfer to racks to cool.
5. While cookies are baking, make icing: sift powdered sugar into a bowl. Cream butter into sugar. Stir in maple syrup and vanilla. Add milk 1 teaspoon at a time until icing is the consistency of a thick glaze.
6. Spread a little bit of icing over each (cooled!) cookie and top with a whole pecan.

Cookies keep in airtight containers 1 week.

November 9, 2009

Last Minute Galettes

Hello! I'm still here, really. Life's just gotten in the way of blogging lately, in a good way. There's been lots of friends visiting, plenty of sweet moments playing with Finn, and lots of starting crafty projects (but not much finishing.) We've had daily walks in the misty breaks between the rain showers and we've admired the ferns peaking out of mossy cracks and the grasses sprouting and turning the hills green and fuzzy. Also many cookies have been baked, unfortunately they were not good enough to blog about so I ate them. All. (Side note: disappointing cookies can redeem themselves if eaten for breakfast.) Laundry has gone unwashed, cereal has been eaten for dinner, and we could all really use a bath. In short, life's been sweet and full and just a little bit hectic.

With all the visitors we've been having, I've turned to a time saving trick from my previous life as a pastry baker: the galette. A galette is sort of a rustic tart and can be filled with sweet or savory ingredients. Pretty and unpretentious, they still manage to be a bit impressive; galettes are the Kate Winslet of the pastry world. The base is a circle of pie dough -- a perfect blank canvas to create all sorts of easy, quick meals and desserts. And here's the time saving secret: make a big batch of galette dough, roll it into single-serving sized circles, and then freeze them to be used when unexpected company arrives or if Mama just doesn't feel like cooking dinner.


Galettes
I hesitate to call this a recipe, it's more of a guideline or a jumping off point. You can use your favorite pie or pastry dough recipe, I've included mine at the end of this post. The sky's the limit when it comes to filling your galettes: for savory fillings think about pizza or quiche ingredients (just make sure your veggies and meats are pre-cooked) and for sweet galettes think fruit pie fillings, jams, and soft cheeses.

Some of my favorite combinations:
roasted veggies and goat cheese
caramelized onions, potatoes, and gruyere
slow-roasted tomatoes, pesto, and fresh mozzarella
blueberries and sweetened cream cheese
apples and a streusel topping
rhubarb and candied ginger


1. Turn pie dough (enough for a double crust pie) onto a work surface and form into eight equally-sized balls. Place on a plate, cover with plastic wrap and chill until firm, at least 30 minutes.
2. Using as little flour as possible, roll each ball into a rough circle about 7 inches in diameter. Try to work the dough as little as possible, you don't want to warm the dough and melt the butter -- that leads to a tough, grainy crust.
3. Layer the circles in a pile, separated by pieces of baking parchment paper or plastic wrap. Slip the pile into a freezer bag and freeze.

The time consuming part of this project is done, now it's time to impress!


On baking day:
1. Greet unexpected visitors at the door, turning your body to hide the spit-up on your left shoulder.
2. Show visitors into living room, subtly kicking dog toys and baby rattle under the couch.
3. Let your guests play with the baby while you excuse yourself to go make tea (and hide the dirty dishes in your sink with soapy water.)
4. While the tea water boils, preheat the oven to 375 degrees, pull a few dough rounds out of the freezer, place on a baking sheet and top with whatever you find in the fridge or freezer (in the galettes photographed here, I used frozen blueberries and slices of white nectarine -- no need to defrost.)
5. When the frozen dough has softened a little bit, work around each circle, folding the dough up around the filling in little pleats. Don't cover all of the filling, leave a little circle visible in the middle.
6. Brush with an egg wash (one egg whisked with 1/4 cup water) or melted butter. Sprinkle with lots of raw sugar (for sweet galettes) or herbs (for savory galettes.)
7. Bake galettes until the crust is golden brown and the filling is tender; the timing will vary a lot depending on whether your filling is pre-cooked or not. Start checking after about 20 minutes.
8. Ta Da! Impress your visitors with your serenity, composure, and French baking skills.


Basic Pastry Dough
2 1/2 cups all-purpose flour
1 1/2 sticks (3/4 cup) cold unsalted butter, cut into 1/2-inch cubes
1/4 cup cold vegetable shortening (or just use more butter)
1/2 teaspoon salt
5 to 7 tablespoons ice water

1. Pulse flour, butter, shortening, and salt in the bowl of a food processor just until mixture resembles coarse meal.
2. With processor motor running, drizzle 5 tablespoons ice water through feeder tube and process just until combined. Do not let dough form a ball!
3. Squeeze a small handful of dough: If it doesn't hold together, add more ice water 1/2 tablespoon at a time, pulsing until incorporated. Do not overwork dough, or pastry will be tough.
4. Shape into eight balls (for galettes) or two discs (for pie crust) and chill at least 30 minutes.

October 22, 2009

Baby's Soft Book of Colors

IMG_1415


This tutorial uses crazy quilt squares to make a soft book for baby. Each "page" is a crazy quilt square with scraps of just one color so baby can see lots of shades and variations of each color; together the pages make up a rainbow soft book. Use scraps with lots of texture and pattern to keep baby interested. Finn and I had a lot of fun choosing the fabric scraps and everyone in my family has enjoyed seeing little bits of memories from their lives sew together: a piece of Granny's shirt, a scrap from a cousin's baby blanket, a bit of fabric leftover from an auntie's first quilt. The whole family has loved "reading" Finn's book of colors!


Finn with his Papa.


Finn with his cousin Ella.


Finn with his auntie Leandra (my little sister) and uncle Obie.

If you've never pieced a crazy quilt (or any quilt) before, don't worry! I hadn't either and it turned out to be really easy and fun. And I've put together a little video to help you.

Supplies:
fabric scraps
1 4" piece of ribbon
fabric for backing: 4 pieces measuring 8"x8", 4 pieces measuring 7 1/2"x7 1/2"
batting: 1 piece measuring 8"x15", 1 piece measuring 7 1/2"x14"
small piece of iron-on velcro
and of course thread, sewing machine, and an iron.

All seam allowances are 1/2".

1. Separate scraps into piles based on color: red, orange, yellow, green, blue, and purple. You should have at least 5 scraps of each color.


2. Piece a crazy quilt square for each color. Use the larger backing squares for red and purple. Use the smaller backing for orange, yellow, green and blue. Here's a video tutorial for piecing crazy quilt squares... it's easy and very free form!


3. Make a front and a back cover using the remaining 8"x8" backing squares. I made a rainbow for the front and embroidered a message on the back. Other ideas are an appliqued title or even just a solid piece of a favorite fabric.


4. Start putting the book together:
Put the back cover face up, top with the front cover face down. Sew along the right side.


Red square face up, top with purple face down. Sew along the right side.
Blue square face up, top with orange face down. Sew along the right side.
Yellow square face up, top with green face down. Sew along the right side.
Press all seams.


5. Attach your velcro: one side to the ribbon, one side to the front cover 1 1/2" from the right side and centered top to bottom.

6. Now for the batting:
Put the back and front covers face up, lay purple and red face down with purple on top of the back cover and red on top of the front cover. Lay the larger piece of batting on top. Sew all three layers together along top, right side, and bottom.

Place blue and orange face up, lay green and yellow face down with green on top of blue and yellow on top of orange, lay one layer of fleece or batting on top. Sew all three layers together along top, right side, and bottom.


Clip corners (but don't clip the seam!), turn both pieces right side out and press.


7. Hand stitch the final seam closed on each piece.

Be sure to stitch the ribbon into the seam between the back cover and the purple square.


8. Hand sew the book together with a line of stitches along the binding of the book. Make sure the colors are in rainbow order. It's ready for baby!
IMG_1400
IMG_1401
IMG_1403
IMG_1415

And I managed to finish this tutorial just in time to enter it into the Sew, Mama, Sew! Scrap Buster contest! Have you been checking out all the scrappy goodness? Lots of Christmas ideas!


Updated to add: If you make a soft book, please consider adding photos of it to Homegrown Happy's Flickr Group.

October 19, 2009

Ag Day

Yesterday was Ag Day at Finn's future school, which is also my elementary alma mater (go Falcons!)

There were some interesting household appliances on display.


The local bakers, wool spinners, beekeepers, and farmers sold their wares.


This little biker showed off his dimples and his croissant.


There were sheep dog trials -- I tried to get Humphrey to take notes on the perfect behavior of those working dogs but he just wanted to chase the sheep; needless to say, he had to stay on-leash.


And some of the parents put together a delicious taco lunch to benefit the new school garden.


The garden is growing well, the worms are composting, and the scare crow is... scaring crows.


And I came home with a full belly, a few tasty treats, some seeds for the winter garden, and of course some crafty goodness.


How did you play this weekend?

October 17, 2009

No Peeking!

Two wonderful things happened yesterday: the rain arrived and Finn finally started napping. It was the perfect opportunity to get started on my crafting for Christmas gifting.


I'll mostly be knitting and crocheting this year so I can take advantage of those sleepy nursing sessions to multitask. I've got a lot of recipients on my list, so I've got to start early and focus on small projects, mostly hats and mittens and the like. Here are some links to things I'm considering making (note to family: now's the time to stop reading...)

[DSC_1786.JPG]
Toasty from a friend to knit with
Garter stitch + knit in the round = perfect movie watching knitting


Mosey from Knitty
I want these for myself!


Fuzzy Lamb from Lulu

[Wallet+Tutorial+10.4.2009+051.jpg]
Zippy Wallet by Noodlehead


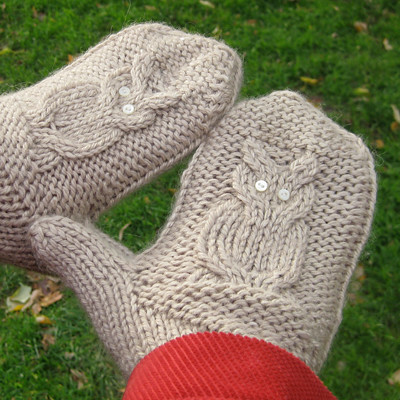
Give a Hoot from Kelbourne Woolens


Turn a Square by Jared from brooklyntweed


Dinosaur Play Mat from Craftzine
It folds up into a volcano shape for storing.


Star Crossed Slouchy Beret by Strands of Me


Danica from Knitty
I've never tried entrelac and I'm embarrassingly excited about this one.


Mushroom Business Card Holder from Wee Folk Art


Calorimetry from Knitty (once again!)


Fetching from (you guessed it) Knitty


Fabric Dollhouse from UK Lass in US
This reminds me of a wooden version my little sister had.


Chunky Button-Up Neckwarmer by Susan Flockhart Designs


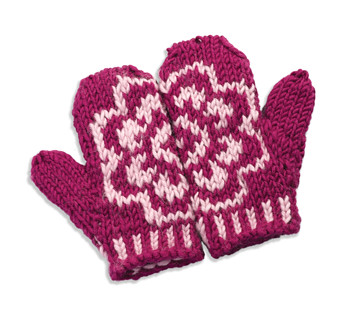
Plum Blossom Mittens from Valley Yarns
Not free, but it's only $1.99 for the pattern


Dainty Earrings by Julie A. Buldoc
Hello stocking stuffers!


Trypdisc Earrings by Tossed Cookies


Jofus and Lally by Vintage Ric-Rac

Plus I've got a few ideas of my own (stay tuned!)  Whew, this is starting to seem a bit overly ambitious...  I better go get crafting!

What are you working on?